This might as well be subtitled “How to pretend to be a geek”. Or just “Geeks. Will they shut up and speak a language I understand already?” Or how about “Not yet a nerd, not yet a woman”?
I will attempt to not delve into acronyms and make jumps that are confusing. This tutorial will assume that one knows how to download and install software on your chosen computing platform. For this example, I’m showing screenshots from a Mac, but the software works pretty much the same on a PC, except with more annoying software installs. And yes, I had to make a dig at sucky PCs and the sucktacular Windows XP.
Some backgound first. Last year in the blurry dark times after Leta was born, I got a new cell phone. It had a camera, but I really didn’t do much with it, as I was disappointed in the results and couldn’t be bothered messing about with something less than the digital SLR. Then I was introduced to Flickr by the blogerati. Then Flickr started making it really easy to upload photos from a phone and display the results on my personal site. During the holidays, I decided to give it another go and I’ve been emailing photos from my LG VX-6000 cellphone to Flickr. It’s sweet. What’s not so sweet are the photo charges that Verizon bills me for every time I send an image. I’ll still email the odd photo, but I’ve become rather addicted to snapping pictures with the phone and I’ll be damned if I’m going to pay that much to email my crappy ass photos for the sake of vanity. I’ll also be damned if these kids with their iPod shuffles are going to tell me what the hell I can do on my Rascal. Not that I necessarily have a Rascal, but if I did, I’d be shaking my fist towards youngsters at every opportunity, while cruising up to 25 miles on a single charge.
I did some research and discovered that my phone can talk to my computer, with simple USB cable and a freeware, open-source app called BitPIM. BitPIM runs on Mac OS X as well as Windows XP, so if you don’t have a Mac, these instructions, with allowances for Windows wanting to install about 8 different drivers, should work. I got it to work on my PC, but I did have to install drivers for the phone (I’ve done the search with the results linked here). In order to follow this tutorial, you’ll want to download BitPIM first, because it contains information on other phones and may tell you which USB cable type you need. I say this because I had purchased a FutureDial USB cable from Radio Shack but as the VX6000 is USB capable, the FutureDial cable didn’t work. Because in reality, it’s a serial-to-USB cable and not a pure USB cable. In non-geek: my phone needed a plain cable; one without a big clunky thing on the cable next to the computer end of the cable. That big clunky thing was screwing up the data transfer. I found this out reading the help section of BitPIM. It had pictures and everything. I returned the FutureDial cable and decided to tempt fate and walk into the gaping jaws of hell: a Verizon store located in a mall.
I went into Verizon and as I predicted, the sales staff wouldn’t sell me a USB cable for my phone (less than a year old and already obsolete) if their lives depended on it. I even had a mental picture of the sales memo that they had all been briefed on about discouraging any sales except for some crazy software package that they wanted $50 for and was Windows only and was a crock of shit. I just needed a simple USB cable. Leaving Verizon to ponder their mistake in not getting my money, I walked 38 feet to a cell phone kiosk (one of the kind that have very patriotic American flag phone faces) and asked if they had a plain USB cable for my phone. They did! I couldn’t believe it. It was in a very sketchy looking package, but it was $20 and the guy said he’d take it back if it didn’t work. I didn’t bother installing the software that came on the unlabeled CD-R. Incidentally, I had done a bunch of searching online for a cable and didn’t come up with a retailer that I felt I could trust, although there is one manufacuture that makes a USB cable that claims to charge the phone while it’s plugged in. This is a nice feature, but I didn’t want to go through the hassle and my local retailer had the right cable.
Because this is turning long-winded, I’m going to recap.
Ingredients:
- 1 cellphone, LG VX-6000
- 1 USB cable made for VX6000 without nubs or blocks of any kind save the parts that connect to the phone and the computer
- BitPIM software downloaded and installed
The first thing to do would be to turn the phone on and connect it to the USB cable and plug the cable into the computer (which would also be powered on). After connecting, nothing will happen if you are running a Mac. If you are on a PC you should be prompted to install a bunch of software. Do it. Mac users, launch BitPIM. You’ll see that while appearing to be shaky (it takes awhile to launch, even on pimped systems), BitPIM will actually perform a very handy set of tasks, none of which are remotely of interest to us save the downloading of photos to the computer. Incidentally, iSync does not recognize the phone so don’t waste your time. Windows users, after you’ve done the installs and your computer tells you it’s okay to wipe, launch BitPIM.
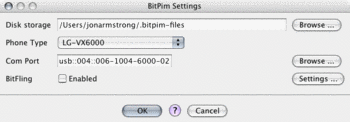
The first thing to do in BitPIM is make sure that your computer can see the phone. On first launch, BitPIM will present you with a settings screen (that you can get to on subsequent launches by hitting the preferences menu under the BitPIM menu. It’s next to the Apple Menu. Windows users, it’s on the Edit menu and it’s called “Settings”.) (fig. 1 – click image below to open a larger, more legible image in a popup window):

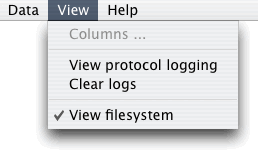
Click the menu next to “Phone Type” and select LG VX6000. Across from the Com Port and the crazy numbers there is a “Browse” button. Click it and make sure to select the line of text that shows a USB CDMA device in it. I don’t know what CDMA stands for, but that’s the one you want. Click “Ok”. If the numbers next to “Com Port” change, your computer is talking to the phone. This may or may not be definitive, but that’s how I knew the phone was talking to the computer. You may or may not need to click the “Browse” button. I did, it worked, so I’m sharing my results. Now that it appears the phone and computer are talking, it’s time to show the files that are on the phone. To see the files, go to the “View” menue and select View:View filesystem (fig. 2):

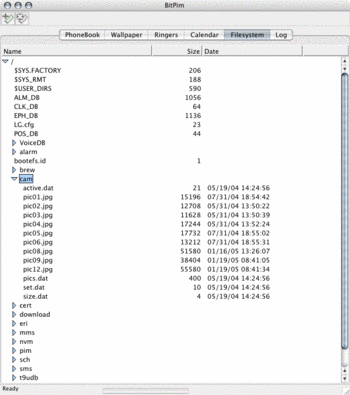
Nothing will happen except that you’ll see a new tab called “Filesystem” and a triangle. Click the triangle. You should see a progress bar and an indication that something is happening. If you get an error window, something is wrong with your cable or your phone. The error window will have a “Help” button on it. Click this to learn more about your phone and it’s cable needs. I’m not going to dive into the help system of BitPIM as that is covered elsewhere and is easily navigated and read by humans.
If all went well, you should see the camera’s file system (fig. 3 – click image for larger, more legible image to display in a popup window):

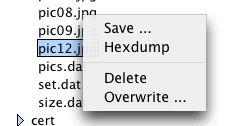
You’ll want to find the line that says “cam” and click the triangle next to it. After a moment, the photos will show up in a list and you can then select them for saving by right-clicking (or, Mac users with a single button mouse, holding down the Control key and clicking) on the name of the image you want to download to your computer (fig. 4):

I tried to select multiple photos to download, but it has to be one at a time. Kind of a bother, but for not having to pay Verizon, one that is minor. Once you release the mouse button, a Save dialog window opens up and you can pick where you want to save the image.
From there, you can do what you want to the image, and we’re one step closer to global understanding and world peace for all nations and peoples.
If you have questions or issues, post them in the comments and I’ll try to help wherever I can. BitPIM supports many other phones, so you might find that this works for you even if you don’t have an LG VX-6000.
